Blog Love

Wednesday, June 29, 2011

Have you read The Book Thief?

I haven't done any book reviews on my blog before, but I just finished this book, and it is FABULOUS!
This Summer I promised myself that I would read a lot. I always encourage my kids to read a lot during the Summer, so I figured I should too. I took the Summer off of school and checked out a ton of books!  This is one of the first one's I read: 

The Book Thief (a summary from The Gradesaver.com)
Narrated by DeathThe Book Thief is the story of Liesel Meminger, a nine-year-old German girl who given up by her mother to live with Hans and Rosa Hubermann in the small town of Molching in 1939, shortly before World War II. On their way to Molching, Liesel's younger brother Werner dies, and she is traumatized, experiencing nightmares about him for months. Hans is a gentle man who brings her comfort and helps her learn to read, starting with a book Liesel took from the cemetery where her brother was buried. Liesel befriends a neighborhood boy, Rudy Steiner, who falls in love with her. At a book burning, Liesel realizes that her father was persecuted for being a Communist, and that her mother was likely killed by the Nazis for the same crime. She is seen stealing a book from the burning by the mayor's wife Ilsa Hermann, who later invites Liesel to read in her library.
Keeping a promise he made to the man who saved his life, Hans agrees to hide a Jew named Max Vandenberg in his basement. Liesel and Max become close friends, and Max writes Liesel two stories about their friendship, both of which are reproduced in the novel. When Hans publicly gives bread to an old Jew being sent to a concentration camp, Max must leave, and Hans is drafted into the military at a time when air raids over major German cities were escalating in terms of frequency and fatality. Liesel next sees Max being marched towards the concentration camp at Dachau. Liesel loses hope and begins to disdain the written word, having learnt that Hitler's propaganda is to blame for the war and the Holocaust and the death of her biological family, but Ilsa encourages her to write. Liesel writes the story of her life in the Hubermanns' basement, where she miraculously survives an air raid that kills Hans, Rosa, Rudy, and everyone else on her block. Liesel survives the war, as does Max. She goes on to live a long life and dies at an old age.

I highly recommend this book to older teens and adults.  Go here to find out more about the book and if it would be appropriate for your child.  I have a 17 year old daughter and I think she would enjoy the book.  

I would love to hear if you have read this book and what you thought of it!  Leave me a comment.  I read every one of them!!

Tuesday, June 28, 2011

Guest Blogger: Today's Fabulous Finds

Hi, my name is Janet from Today's Fabulous Finds.  It's such a thrill to be guest posting here at Pocket Full of Pink!  Karen was one of the very first to sign up as a reader of my blog and has been such a great support, she's awesome!

Today's Fabulous Finds is a place where I share fabulous finds from around the web as well as my own printables and craft and home decor projects.  Here's a few things I've made:
Printable Subway Art:  
There is one for every holiday from Thanksgiving to the 4th of July, with more to come!
 Flowers made with Crepe Paper Streamers
Stenciled Job Board
Today I'll be showing you how to make a Paint Stick Window.
I really wanted a little window to set on my shelf, but couldn't find one anywhere, so I came up with the idea to make my own window with paint sticks and glass from a dollar store picture frame. 
Here's what you'll need:
  • 2-(five gallon size) paint sticks (if you don't have a couple already, you can buy them at Home Depot and Wal-mart)
  • narrow trim (I'm trying to remember what it's called, it measures @3/4" wide, is flat on the top with rounded edges)
  • saw and miter box 
  • wood glue (can use hot glue, but it won't be as strong)
  • sandpaper
  • glass-from a picture frame (try the dollar store) or have it cut for you
  • paint
  • caulk or wood filler
  • stain or distress ink
Directions:
1. Decide what size you want your window.  This one is cut at 9 1/2 inches on the longest side of the paint stick, perfect for an 8x8 piece of glass.  (You can get two sides out of one paint stick if you cut it like I did in the picture above using the previous cut for the second piece.)
2.  Line up the four sides of the window to make sure the angles match nicely.  You might need to sand the ends some.
3.  Measure the distance inside of the frame.  Divide it in half and use that length for the length of the narrow rounded trim for the window pane dividers.  Center the 45 degree angled cut on the marked line.  Cut a 45 degree angle on the other side of the piece so it comes to a point.  Cut the other 3 pieces. (Tip: On the second piece you cut, the first 45 degree angled cut will already be done from the previous piece.  This saves a bit of cutting. See the picture above.)
4.  Line up the center pieces to make sure that they fit. 
5.  Glue the center pieces in place.  I first tried wood glue, which would have been perfect except that the gaps were a bit too big and it wasn't holding in place very well.  I ended up using hot glue, which isn't the best because it's not nearly as strong as wood glue and doesn't hold to the wood as well.   I knew though that the when I added the glass it would make it stronger so I went ahead and used it. 
6.  Fill any gaps with caulk or wood filler. (I used white paintable caulk for this step, not the caulk pictured above.)  I was going for an aged look, so I didn't completely fill the gaps with the caulk.  Let it dry completely before you paint. 
7.  Paint the window (I didn't bother to paint the back). 
8.  This next step is hard to see in the picture.  Put a bead of clear kitchen/bath caulk around the inside of the frame and on the center of the inside pieces.
I used the glass from this dollar frame for my window.  It's an 8x8 frame.
9.  Take the piece of glass, line it up, and press it down on the caulk.  The caulk will hold the glass in place when it's dry.
10.  Age the window.  Distress it by sanding the areas you want distressed some and then go over it with distress ink (I used dark walnut) or stain. 
You can make whatever size of window you'd like by using different sizes of wood and glass.  Or you could use a mirror, pictures, cork board, etc. instead of glass or just leave it empty.  There are a lot of possibilities.
Because I only needed to buy the picture frame for the glass and already had the other supplies, I was able to make this paned window for only $1!  One thing I love is a great deal. :)
I'd love to have you come over and visit Today's Fabulous Finds!  You might like my other paint stick projects as well, including a narrow crate and printable Christmas ornaments
Thanks for the opportunity to share my blog with your readers Karen!

Sunday, June 26, 2011

Guest Posting at HOH!!

You have to stop by Allison's blog House of Hepworths today!  I am guest posting!!  Can you believe it??? I am so excited!  She is on a road trip and is having over 60 guest bloggers during the next month.  You should go over and check them all out!!  She has a fabulous blog and is so sweet!!

Thursday, June 23, 2011

Fabric Bookmarks


In about 2 weeks, I am leaving for a family reunion in Utah.  I am really excited to see my sisters, nieces, nephews and all their kids!  It will be super fun!!

I wanted to make something for the kids and moms just for fun.  I found this bookmark tutorial on Little Birdie Secrets.  I have a TON of fabric scraps I have been wanting to use up, so I gave it a try!  I love the way they turned out!!  I also want to make some key fobs, little boy bow ties and headbands. 

 I know what your thinking, "Karen, you will never get all that done!"  Well, your probably right!  I always  want to do too much and never have enough time!  I am going to try.....I'll post them WHEN I get them done, K?
I just love all the pretty colors and the cute rosette's, don't you???
I think everyone (well, maybe not the guys) will like these!

Linking with these parties:
House of Hepworths
A Little Tipsy
504 Main
Under the Table and Dreaming
Someday Crafts
Sisters Stuff

Shabby Apple Dress Giveaway Winner!


The winner of the Shabby Apple Dress is: #9

The Miller Five said...
I love every single one of their dresses, but I really like the Glacier.

Congratulations Miller Five!  I will be sending you an e-mail shortly!!


Monday, June 20, 2011

Monogrammed Notebook Tutorial

There is still time to enter the Shabby Apple Giveaway!!  Enter here!


A week or so ago I was a guest blogger over at Oopsey Daisy.  Here is the cute Monogrammed Notebook that I showed her readers how to make!

Today I am going to show you how to make a cute notebook with monogram and matching pen.  I love making personalized gifts for people and this is one of my favorites!  


Here's what you need:
Blank note book (I got a pack of 2 or 3 at Dollar Tree)
Pen that has a top that screws off on the top (Dollar Tree)
scrapbook paper
glue stick
foam stamp
paint
flowers, stickers, buttons (whatever you want to embellish with!)


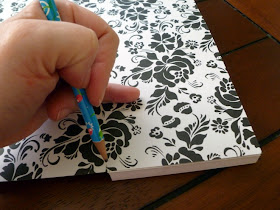
First, you measure a piece of Scrapbook paper the same size of the notebook with a little extra for the top of the notebook.  

Then, you glue the paper down.  I used a glue stick or you can use a tape runner. 


This is probably the hardest step, but it is really easy!  Cut a small piece of paper that matches the size of your notebook.  Make sure you measure it the right length of the pen well.  Roll it in a tube shape small enough to fit into the pen well.  Stick the paper tube in the well.  Screw the bottom of the pen back on.
Next, I used a foam stamp and acrylic paint and stamped the letter onto a piece of coordinating scrapbook paper.  Once the letter is dry, cut out the paper to fit on the paper pad.
I also added a coordinating sticker on the bottom of the note pad.
Last step, I added a cute silk flower in the upper corner with a button on top!  
What a fun personalized gift to give a friend, sister, etc, right?  


Sunday, June 19, 2011

Happy Father's Day Big Hunk!

Have you entered the Shabby Apple Giveaway yet??  If you want to click HERE.

Here is what the Daddy's of the nursery kids are getting today!
A big ol' Hershey bar.  Here is what it says on the back:
I love it! I think they will enjoy it (if the nursery kids don't get to it first!).
I got this idea here.

Today we are having everyone over to our house for a big Father's Day dinner.  
I am making hubs a Pot Roast, his mom is making Dutch Vegetable whip (yummy!), and my mom is bringing the salad.  I will make gravy and some rolls.  For dessert we are having Hot Fudge Sundae cake.  Oh, so yummy!!  

I love you hubs and Dad, you are the best!  I am sooooo grateful for you!!

Hubs with my (almost) 15 yr. old son.

Here's my Dad!  He would NOT be happy if he knew I posted this picture!!  Isn't he adorable??
He really is the most fantastic Father ever!  He is my hero.

Enjoy your day today.  Tell a Dad, husband, or SOMEONE you LOVE them!  It will make their day!!

Friday, June 17, 2011

Shabby Apple Dress Giveaway!


Have you all heard of Shabby Apple? 


Let me tell you a little bit about them.  They are just a fabulous company!  They make amazing women's dressesmaternity dressesbridesmaid dresses, , beautiful modest bathing suits!! 

(in season!!) and little girl dresses.


The great thing about Shabby Apple dresses actually cover enough skin to make you really feel comfortable (without wearing a tank top, cardigan or long slip).  Shabby Apple is proud to offer you fantastic dresses that allow you to look fabulous, without having to compromise anything else.  I love what they say on their site:


A return to what dresses were always meant to be — a one-piece outfit. No need to add anything...no tank tops, no cardigans, nothing (except accessories, of course!).


And another fun fact?  They are focused on helping women worldwide. Through their charitable work with women throughout Asia and Africa, they are able to convert dress sales into lifestyle changes for women and children.  How fabulous is that!  It makes you feel even better about purchasing from them.

Here is the dress that YOU can win from Shabby Apple!  I seriously wish that I could win it!!
Isn't it just gorgeous?  I love the color!!


To enter:
Leave a separate comment for each entry.

1. Like Shabby Apple on Facebook! Leave a comment saying you did.


Additional ways to enter!
LEAVE A SEPARATE COMMENT FOR EACH ENTRY!!!!


2. Check out Shabby Apple and tell me what dress or piece you love the most!


3.  Write a post, on your facebook wall, or tweet about this giveaway (include a direct link to the giveaway in your post, etc. please)   Add the url link to the comment you leave here.

4. Become a Google Friend Connect public follower, Like me on Facebook, or become a twitter follower.

5. Add Pocket Full of Pink to your blog reading list on your blog.  Let me know that you did with a link to your blog.

This giveaway will close on Thursday June 23rd and the winner will be announced shortly thereafter.  Thanks!! The winner must have a US shipping address. Also, there will be no exchanges for the winning dress.


If you see a dress you must buy today, don't forget to use the 10% off code they are offering Pocket Full of Pink readers!  The 10% off coupon code is "pocketfullofpink10off" and will expire in 30 days!!  So use it up fast!

Thursday, June 16, 2011

Red, White and Blue Mod Podge Craft

I have mentioned there is a craft store nearby that is going out of business.  Well let's just say I have been there a few times and now everything is at least 50% off!

I bought some blank MDF boards that were 70% off that I thought I could decorate with scrapbook paper and maybe paint.  

I don't have very many 4th of July decorations so here is what I did to the first board I bought:
It was super easy!  I painted the whole board with red acrylic paint.  Let it dry completely.  Then I sanded the edges everywhere.  
Next, I cut out the letters using my Cricut and Lyrical Letters cartridge.  I also found the stars and fireworks on one of my cartridges.  
Lastly, I coated the whole thing with Mod Podge!  I am very happy with the way it turned out.  

What an easy and quick 4th of July decoration!  It cost me about $1.50!  

What kind of 4th of July crafts are you working on??

P.S.  I am still looking for some guest bloggers.  I have a few spaces open, so if you are interested, please see previous post!  I would love to see what you've got:) 


I am linking here at these parties:

Wednesday, June 15, 2011

Wanna Guest Blog on Pocket Full of Pink?


So, are you a blogger?
Would you like the chance to guest blog at Pocket Full of Pink?
I will be on vacation from July 7th through July 13th and am looking for some guest bloggers to fill the void.
I can’t guarantee I’ll post every post I receive, but I’ll try to post as many as I can.
If you’d like to guest blog at Pocket Full of Pink while I'm on a much needed vacation, here’s what I want:
A post that introduces yourself and then shows off no more than 3 projects/crafts/recipes/etc that you’ve done on your blog so far. Please only include one or two pictures max per project.
This is not a tutorial post, this is an introductory post. I want you to just introduce yourself and convince my readers why they should check out your blog. Remember, no more than 3 projects.
In a nutshell: Your header image, photo of you if you have one, intro about yourself, 3 projects with explanations about each, closing paragraph or sentence. Done.
As I receive your code, I’ll schedule a day for you and let you know when you will be featured. All I ask for in return is that you post on your blog the day of letting your readers know you are guest blogging at Pocket Full of Pink.
Email your code to kweight@byu.net.
Thanks so much for helping me out while I’m on vacation!

Tuesday, June 14, 2011

Guest Post: Alison from Oopsey Daisy

Hello, my friends!   
My name is Alison, and I blog at Oopsey Daisy. 
 
I love to make things for the people I love. 
My blog tells the twists and turns of my crafting journeys. 
I am thrilled to be a guest at Pocket Full of Pink.  I love Karen's ideas.  She is so talented!

Today I want to share a quick and easy Father's Day idea with you.


The M&M bow-tie is easily adaptable for Dad's, Grandpa's, and Uncle's!  Who doesn't love a bag of melt-in-your-mouth M&M's?!  We made these for Father's Day last year, and they were a hit!  I revisited the idea again this year... this time with a printable!

To create your own bowtie, all you need is a bag of M&M's and some ribbon!  I love all of the different M&M varieties!  We used regular M&M's, plus peanut M&M's and the new pretzel M&M's.

Simply pinch the bag's center and wrap some ribbon around it.  You could use a little extra ribbon to add a tag if your choose.

I created an M&M printable in Photoshop and printed it on scrapbook paper.

 I used these printables to create a card to accompany the bowtie.  You could also use a little extra ribbon to attach them as tags.

If you'd like to print your own M&M tags, just click the images below to enlarge.   
Print on some scrapbook paper, and you have a lovely tag!


Or you can download your own  set of M&M Thanks notes here
There's nothing more dapper than a man with a bowtie! :)

Enjoy a happy Father's Day with the special men in your lives!
Thanks, Karen, for letting me share today.

Linking up with these parties:

Monday, June 13, 2011

Summer Mod Podge metal sign

There is a craft store near my house that is going out of business and let me tell you I have gone there 10 5 times at least in the last month or so.  So needless to say I have purchased a few things to make some fabulous crafts to show you!

One of the things I bought was what I think is some kind of metal or tin, but I'm not sure.  It cost me about 3 bucks and I bought 2 of them.  They came blank and here is what I did with one of them:

Here is what I did to it:
I turned it upside down and traced the shape  on the scrapbook paper.  
Cut out the shape.
Mod podged the paper on the sign.
Cut out the letters with my Cricut.  
Coated the sign with 1 more layer of mod podge.
Hung it with pretty ribbon!
Done.


Super easy and I think it turned out pretty good!  It probably took me a total of about 1 hour or so with drying time.
Here's how I am displaying it.

Have a great day!!

I am linking with these parties:
Craftomaniac
The Creative Itch
Someday Crafts
Sisters Stuff
Lil Luna