Blog Love

Monday, October 31, 2011

Today's Guest: Sugar Bee Crafts

Hi everyone!! I'm Mandy, from over at Sugar Bee Crafts:


Here's the whole gang on vacation this past summer:


I enjoy all things crafty and have lots of DIY and tutorials on my blog.  I even have a link party on Tuesdays so I can see your craftiness - then I show off a bunch of you on Wednesdays.  You might know me from a couple of my posts (click picture to check them out!):


Today I want to show you a quick how-to on making Pinwheel Hairclips.  You could make them in fall colors or Halloween colors or whatever you want.  I made one fall-ish with the turquoise and I am working ahead and made a holiday one as well.

First off iron a strip of heat-n-bond onto the back of some fabric:
 Then cut out 2 felt squares (mine were 2 1/2 inches) and 2 fabric squares out of the fabric that has heat-n-bond on it.  The fabric squares should be slightly smaller than the felt squares.


Peel the back off the fabric:

 Then iron it to the felt:

 Then make four cuts from the corners.  Be sure NOT to cut all the way  through - leave about 1/4 to 1/2 inch before you hit the center.  Cut lines are shown with white dashes:

 Then fold down one corner and secure it with hot glue in the center.  Then move on to the next corner.  Glue each corner down to the center.


Find some coordinating buttons and hot glue those on to cover the center:

Hot glue a hair clip to the back.  I use small pieces of non-slip shelf liner to go over where the clip attaches to the pinwheel - it helps the clip stay in place:

 Clip in and enjoy!!


 As you can see in the picture, the fabric can go on the inside or outside of the pinwheel, so have fun playing around with different designs:


 Happy Fall!!  Hope to see you over at Sugar Bee Crafts!


Sunday, October 30, 2011

Domestic Charm Giveaway


Have you heard of Domestic Charm?  Katelyn has the cutest Etsy shop with tons of lovely party items.  Here is a little about Katelyn and her shop:

I am a wife and a mother to two boys. In my spare time I enjoy being crafty and making different things, I sell some of those things along with party supplies in my shop! Check out my blog for craft ideas, recipes, party inspiration, and more!

I am always in awe of these women who have small children and run an etsy shop, blog, etc. and can balance all this with their family too.  She is amazing!  

Ready for the Giveaway?  Katelyn from Domestic Charm is graciously giving away  a set of 12 cupcake toppers and 20 paper straws to one of my readers!  
Here is what you need to do:
Please leave a comment for each entry to let me know you did these.

1. {Mandatory} Heart Domestic Charm on Etsy and come back here to let me know what your favorite item is in her shop.

Extra Entries
2.  Go visit her darling Blog and Follow her.  {she has some really cute ideas on her blog!}

3. Like Domestic Charm on Facebook.  It would be really nice if you left her a comment to thank her for the giveaway:)

4.  Follow Domestic Charm on Twitter.


That's it!  I am so excited to see who wins!!  This giveaway will end Thursday November 3rd @midnight and I will announce the winner Friday morning.  
OPEN TO U.S. RESIDENTS ONLY.
Good luck!!

Saturday, October 29, 2011

Yummy Pumpkin Pancakes

Don't forget to link up your latest crafts at Friday Frolic here!
Do you see my NEW social buttons?------------------------------->
PLEASE follow and LIKE me!!


This morning I felt like making something with Pumpkin in it.  I found this recipe on Allrecipes.   It was sooooo yummy!  My kids even loved them:)  I liked them, because they didn't have a ton of sugar in them.  Here is the recipe:
INGREDIENTS:
1 1/2 cups milk
1 cup pumpkin puree
1 egg
2 tablespoons vegetable oil
2 tablespoons vinegar
2 cups all-purpose flour
3 tablespoons brown sugar
2 teaspoons baking powder
1 teaspoon baking soda
1 teaspoon ground allspice
1 teaspoon ground cinnamon
1/2 teaspoon ground ginger
1/2 teaspoon salt
DIRECTIONS:
1.In a bowl, mix together the milk, pumpkin, egg, oil and vinegar. Combine the flour, brown sugar, baking powder, baking soda, allspice, cinnamon, ginger and salt in a separate


 bowl. Stir into the pumpkin mixture just enough to combine.
2.Heat a lightly oiled griddle or frying pan over medium high heat. Pour or scoop the batter onto the griddle, using approximately 1/4 cup for each pancake. Brown on both sides and serve hot.

Enjoy!  

Friday, October 28, 2011

My first Ever Pocket Full of Pink Friday Frolic link party!!

I know I don't have a Friday Frolic button quite yet (working on that!).  Please be a sweetie and link back with a text link, or you can grab my blog button!  Thank so much-


Today's Guest: Fireflies and Jellybeans


Hello Pocket Full of Pink!  I am so excited to be here to day to share with you a fun Fall Craft!
The Monster Bash is super fun isn't!  Are you loving it as much as I am?!
Let me introduce myself!
I am Fawnda and you can find me at Fireflies and Jellybeans!  I am a thirty-something mom of a son (3 1/2 years old) and a daughter (17 months)!  My Husband is my best friend and biggest supporter {I am every lucky}!
We have all sorts of fun over at Fireflies and Jellybeans! I share crafty tutorials with you, we have the Iron Crafter Competition and a fun Show Off Your Stuff linky party on Thursdays.


Today I am going to show you this super fun and easy Fall leaf table runner!
Fall is my second favorite time of year (summer being the 1st!).  I love the color of the leaves and the start of school and to decorate for fall! This fall leaf table runner is perfect for this time of year!

Here is what you need:
Fall colored felt or fleece
Leaf patterns (I used clip art for mine)
Scissors
Sewing machine (optional- you could hand sew if you want!)
Brown thread
 
1.) Cut out a BUNCH of leaves out of your felt/ fleece
 
 
I cut out about 22. Don't they look so pretty all piled up. I almost want to jump into them!


2.) Sew on leaf details on each leaf. It is a bit tedious - but so worth it! : )


3.) Sew sets of two leaves together at the tips.


4.) Line up at your pairs of leaves to get an idea of what order you want them to be placed in. I didn't want the same kind or color of leaf to be touching, but otherwise it was pretty random.


5.) Pile up all your leaf pair in the order you want to sew them.


6.) Sew your leaves pairs together. This also can be a bit tedious I sewed some together at the tips and others more to the bottom part of the leaves. I just had to see how it fit the best. But I would guess if you are a quilter you would probably be better at lining these up than I was.


7.) Lay it out on you table.
Or place you fall centerpiece on it! Find out how to make this one here.

Stop by Fireflies and Jellybeans for more fun ideas!


I love the Fall colors and I LOVE table runners!  So much fun.  Thanks for stopping by Fawnda!  If you haven't already, you HAVE to stop by her fabulous blog.  She has so many cool ideas for crafts.  Here is one of my favs:

I just love the whitewashed look of the frame!  The pretty wood flowers on the corners are gorgeous!  Check out the tuorial here.

Thursday, October 27, 2011

Today's Guest MichellePaige.blogspot.com

Hi! I'm Michelle visiting from my crafty blog called, Michelle">http://michellepaige.blogspot.com/">Michelle Paige.
I'm so excited to be a part of the Monster Craft Bash Party at a Pocket Full of Pink!  Thanks for having me, Karen.
It's almost Halloween, but don't worry...
you still have plenty of time to whip out these fun chocolate-peanut butter cookies! 
Start now and you can be done within the hour, plus did I mention how easy they are? 
They're so simple, your kids can help you, and you probably have everything you need to make them right now!  No trick! 
You'll need:  1 cup peanut butter (smooth or crunchy- you choose.)
2 eggs
1/3 cup water
1 chocolate cake mix (any chocolate flavor)
In addition you'll need 1/4 cup granulated sugar-- you see why, soon.
And get out any Halloween candy you have to make the faces.
This is what I used, but you could use any little candies you already have.
(Of course you have candy around...it's almost Halloween!
Or, did you already get into the Halloween candy...like me?  Hmmm?)
Beat together 1 cup peanut butter, 2 eggs and 1/3 cup water.
Slowly add the dry cake mix.
Mix well.
Using your hands, form dough into 1" balls.
Place on cookie sheet.
Put 1/4 cup of granulated sugar on a plate.
Using the bottom of a drinking glass, dip glass in sugar,
then press glass on ball.  Repeat with each ball.
Now you have perfect round cookies!
Here's the fun part!  Using your fingers, pinch out ears near the top of each circle cookie.
If your kids are helping, you may get some interesting shapes as well!
My son formed a flying bat when he was supposed to be 'pinching ears'!

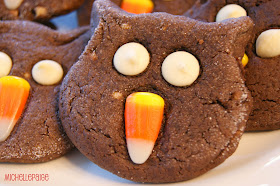
To make owl cookies, stick in two white chocolate chips for the eyes
and one piece of candy corn for the beak. 
Or, use whatever little candies you have!
 
For the cat, I used two white chocolate chips for the eyes,
one red hot candy for the nose...
and I found these Candy Sticks at the Dollar Store for the whiskers.
When I opened them, they reminded me of those candy cigarettes they used to make when I was a kid.
(Can you believe I'm that old to remember those things?  I am not telling my kids they used to make candy cigarettes!  Ugh!) 
Anyway, I broke each stick in half and stuck two sticks on each side of the nose.
If you don't have candy for the whiskers, use a fork and press into the dough on both sides.
It will make nice whisker marks.
Bake cookies at 375 degrees for 8 minutes.
(See, I told you they were quick!)
Aren't they adorable?
How can you resist these soft, chewy chocolate cookies? 
You can even package them up in a cellophane bag with a cute handwritten tag and give to someone you love.
Whoooo Loves You?  We do!
Happy Halloween!
I'd love for you to come visit my blog, Michelle">http://michellepaige.blogspot.com/">Michelle Paige
 for more creative recipes, tips, ideas and crafts.
PLUS...
It's almost my birthday (it's a big one!)
 and you won't believe what my AH (awesome husband) has been up to!
He's kind of been impressing my friends (and me) with his creativity and secrecy...
you'll have to come check it out and see!


Here's the recipe in it's entirety:
Super Fast Halloween Cat & Owl Cookies
Ingredients:
1 cup peanut butter
1/3 cup water
2 eggs
1 package chocolate cake mix
1/4 cup granulated sugar (for flattening cookies)
Candies for the faces: white chocolate chips, candy corn, red hots, candy sticks, etc.
Directions:
Preheat oven to 350 degrees. Beat together peanut butter, eggs and water. Add in cake mix slowly and mix well. Form dough into 1" balls and place on ungreased cookie sheet. Using a glass dipped in sugar, press glass onto ball to flatten. Repeat for each ball. Pinch out the ears near the top of each cookie. Add candies for the face. Bake for 8-10 minutes. Enjoy!