Wednesday, February 29, 2012

Friday Frolic top 5 Features!

Can I just say that I REALLY enjoyed going through all of the goodies you all linked up last week!!

I had several comments from visitors saying they were excited to try some of the crafts that were linked up:)  

You all amaze me with your talents!!

Here are the top 5 viewed links from last week:

St. Patrick's Day Decorations from Cupcake Kisses 'N' Crumbs.


Monogram Canvas from My Hearts Desire.


Spring Party Ideas from A to Zebra Celebrations.


Homespun With Love and Can of 3 Shamrocks.


Last but not least one of my favorite blogs Today's Fabulous Finds and her St. Patrick's Day Interchangeable Frame.

Thanks to all who linked up and I hope you'll join us this Friday for Friday Frolic Party!!  

If you were featured here, feel free to grab a FEATURED button on my sidebar. 

Have a great day!

Tuesday, February 28, 2012

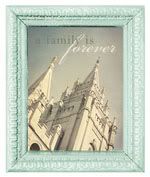
Temple Wood Block

Sorry I missed posting yesterday.  I have another Chemistry mid-term tomorrow and I have been studying like crazy!!  Hope it pays off:)  How is your day going??

A person can only study for so long, so I got the urge to make something.  I have wanted to make these forever, and to be completely honest, I have tried them several times, but had some serious craft fails!  Finally I figured things out and it worked!!


I got my print here at The Idea Door.  I have seen other versions, but this is my favorite.  So many great ideas at this site!!  LOVE IT!

Here is what you need:
-5 x 6 piece of wood. I routed the edges because I got a new router:)

- 3 1/2 x 5 Printed picture of the temple, or whatever picture you would like!

-paint {whatever color you choose}. 

-7/16" upholstery nails {about 3 bucks at Home depot and you get 24}.

Rust-O-leum Ultimate Polyurethane Soft touch Finish.  I like the Matte finish.  {about 6.99 for 8 oz. at Lowe's}.

-Mod Podge

-If you like the vintage look, I used a Tim Holtz ink pad {vintage}.

First I painted the wood and let it dry. 

Here is where I messed up before.  The ink from my printer seems to run when I cover the image with mod podge, so this time I glued the picture on with mod podge, but did not cover the top part with it. I also printed the picture on white scrapbook paper.  I don't know if that made a difference, but I think it looks a little nicer!

Next, I sanded all the edges to make it look distressed, including the picture a little bit.  Then, I covered the edges of the paper and wood with the Vintage ink pad. 

After that was dry, I hammered the upholstery nails in each corner of the picture.  I really like the way the nails look.  It gives it even more of a vintage look!

After everything is dry, brush a think layer of the Polyurethane all over the wood.  Let dry.

LOOKS FABULOUS, huh?


These would be great for gifts for little kids.  This one is going in my daughters room.  I want to make a lot more:)


I will be back later tomorrow afternoon for the Friday Frolic Features!  See ya soon:)


Sunday, February 26, 2012

Keeping it Real {Sunday}

I have been slacking lately with my posts.  My life feels a little crazy right now.  I am going to school, dealing PMS now just about 3 weeks out of the month, and have been a bit of a Debby Downer lately.  

Sorry!
I have been feeling a bit like this.
It's no fun getting older, I tell ya!! Your body goes through all kinds of funny and not so fun changes!!  Some times I feel like I should just commit myself already!

Thank goodness for my husband and kids. I am so grateful for them.  Without them, who knows where I would be.  

Today I am home not feeling well and trying to read some uplifting material.  I came across this earlier:
 
 
LOVE IT!!  Lifts me up and makes me feel like everything is going to be OK!  No worries.  LIFE IS GOOD:)

No matter what we are going through, there is always tomorrow.  I look forward to a new day....

Love you guys!!

{OH, and I am featuring lots of the Friday Frolic links on my FB.  If you don't already follow me, please do!!}

Friday, February 24, 2012

Thursday, February 23, 2012

Changing my purse from cute to CAUUUTE!!


 So I have this purse.  I really liked it when I bought it last year.  I had an idea of something I wanted to do to it to add a little POP color. 

Shoot, I forgot to take a before picture.  Well, you can imagine what it looked like with out the pretty flowers, can't you?  


I LOVE these cute flowers!  I can't get enough of them!!  I found another awesome tutorial on how to make them and some other fancy ones. 

You should try and make some of these.  They are easy and FUN to make!  

Have a great day.  See you tomorrow for Friday Frolic:)

Wednesday, February 22, 2012

Green St. Patrick's Day Wreath {tutorial}


Today I caught the craft bug!  I have wanted to make some kind of St. Patrick's Day wreath, but I just wasn't sure what I wanted it to look like. 

So today I went at it.  Here is what I came up with!

I started off with about 6 different patterns of fabric.  Most of them were fabric quarters on sale at JoAnns this last weekend.

I also cut strips of Burlap to cover up the white styrofoam wreath.  

Here it is all wrapped up and ready to decorate!

I didn't take pictures of making the flowers, but there are some fabulous tutorials already out there.  Here is one I used.


I never really decorated for St. Paddy's Day before, but it's kinda fun to see what I can come up with!  I love the way it turned out:)  

Have a great day and thanks for stopping by!


Tuesday, February 21, 2012

Friday Frolic top 5 Features!

A huge thank you to all of you who linked up at Friday Frolic!!  I was so excited to see 78 links!!  Wahooo- that's the most we've had yet!

I really appreciate you guys.  My readers are SOOOOO important to me.  I wouldn't be here without you.  THANKS!!

Now, on the the top 5 viewed links from last week!

Spring Subway Art Print from Jill Create Craft Love!  Aren't the colors fabulous?  I love this!! Check out her blog for a free download.

I am seriously CRUSHING on the Pinwheel wreath at Loopy Loop Creations!

 Mrs. Crafty Pants made these adorable Kitchen towels.  Love the flower appliques!

I love this Baseball Art that Tales of a Trophy Wife made.  It Would look darling in a boys room:)

I fell in LOVE with these Fabric Letters that Little Things Bring Smiles Made!  The fabric is gorgeous!  

Feel free to grab a featured button if you were featured today! 
 
That wraps it up for today!!  

I will be back tomorrow to share a Lovely St. Patrick's Day craft with you!!

Sunday, February 19, 2012

DIY St. Patrick's Day Banner {Easy!}


Sorry, no Keeping it Real today.  I just didn't have it in me.  I guess that's the beauty of having your own blog!  
I'll be back next Sunday with it, K?!

Today I wanted to craft! 

 I have been wanting to make a St. Patrick's Day Banner and when I saw Rebecca Coopers banner {with tutorial!} on her blog Simple as That, I just HAD to make one!  

You should go check out her blog.  It is AMAZING!  She is a fantastic Photographer, Scrapbooker, Crafter and Mom!  


For my banner, I bought an old hard cover book from a thrift store.  $2 bucks.  I love the old look of the pages!  

Then, instead of string, I used some grosgrain ribbon I had laying around.  I folded it in half, then used double stick tape to keep it folded.  

I almost sewed mine together, but I was too lazy to get my sewing machine out. 
I stapled the paper to the ribbon.  EASY!  

It took me about 45 minutes to make this and my 10 year old daughter helped trace the shamrocks.  She loves to craft too!


Hope your having a Lovely weekend!  It is 11:30am and I am still in my Jammies!  Yay!!


Friday, February 17, 2012

Thursday, February 16, 2012

7 St. Patrick's Day ideas!

I'm not a big St. Patrick's Day person, but the last few years I have made some decorations for the holiday.  It's amazing what you can up with!  Just get your creative juices flowing!!

 You can't help but get motivated to make something when you see what other people are doing.  It's amazing!! 

 Here are some ideas I fell in LOVE with:

Here's a SUPER cute idea for a treat from It is What it is.
I didn't even know there was such a thing as rainbow licorice!

Subway Art is one of my favorite ways to decorate.  So easy and it looks great!  The girls at Eighteen 25 created a cool Subway Art and are so nice to share!!

Rebecca over at Simple As That made this cute and simple Clover banner.  I love the book pages!  I seriously want to make this!!

Jen from Craftomaniac made this adorable wreath for St. Paddy's Day.  I love the cute little horseshoes! 

I am Mommy made this absolutely DIVINE St. Patrick's Day Cake.  Yummo!

I love this!  I want to try it on my little Girl!  This is from Cute Girls Hairstyles.


One more Fabulous printable from Today's Fabulous Finds!

Wednesday, February 15, 2012

Friday Frolic features!!

I had so much fun going through all the crafts that were linked up last Friday!!  You guys are truly amazing me.

 I  want you to know how grateful I am for linking up each week!  There are a lot of Parties out there and I appreciate you visiting mine!

Without further adieu, here are the top viewed links from last week!

Valentine Bunting Wreath:  Mrs. Crafty Pants


Waterproof Snack Bags:  Destination Craft


Favorite Things:  Thoughts In Vinyl


$4 Valentine Wreath:  Making it Feel Like Home

DIY Magnet Board:  Scattered Thoughts of a SAHM.

Button Balloon Embroidery:  City Girl Gone Coastal

That about wraps it up!  Thanks again for stopping by and be sure and join us Friday for another FRIDAY FROLIC!!

Tuesday, February 14, 2012

Happy Hearts Day and Subway Art!

How is your day going so far?  I am excited to go out with my hubby tonight to celebrate Valentine's Day!  

It's hard to believe we have been married for 20 years in August!  
Do you want to know what we did on our first date?  We babysat! 


Weird, huh?  I totally remember the day he called and asked me out.  I was working in a salon doing hair.  He called and asked me to go out on Valentine's Day.  I had already told a good friend I would babysit for her.  

I asked him if he wanted to come over and babysit with me.  He said yes!  We actually had a great time!  Afterwards we went dancing.  GREAT TIME!!


What are you all doing tonight?  Anything exciting??  


I have to share my last V-day project with you!!  It is reversible!  I ordered the vinyl and wood from Thoughts in Vinyl.  I LOVE this place!  

You should stop by and check them out.  They have so many cute and reasonably priced kits. 

Here's what I finished last night:

Cute, right?  I used My Minds Eye paper and covered it with Mod Podge before I adhered the vinyl.  The "Be Mine" area I painted with Martha Stewart Poodle Skirt Pink.  

Here's what I love the most about this:

 It's Reversible!  I LOVE to save room in my craft closet!  

Have a "LOVE"ly day!  


Feather Boa Tree {Guest Post}

Hello Ladies...and I am sure a few Gents! Here is your Valentine's Day Tutorial!

I sneaked out of the house the other day while Eliza napped and Mark played video games, to swing by Michaels. While checking out I saw a "floral arrangement" on SALE for 49.99!! What?? I can TOTALLY make that! So I did!!


Small disclaimer, this tree does not photograph well! I did it in every light, with pro camera and camera phone, it just doesn't capture the awesomeness of the feathers. I SWEAR it is SUPER cute!!

Start off with supplies-

Styrofoam Cone
Feather Boa, or 2 if you buy a big cone
Ribbon
Embellishment
Candle Stick
Hot Glue


Start out with your cone, side note-you can not spray paint Styrofoam, didn't know that! So move on with your cone with whatever color you bought. Take a boa and find an end, trim the extra rope they use so it is flush with the feathers. Take your hot glue and put a large bead at the bottom of the cone.


Lay your cone down with the feather boa coming toward you. Do a string of glue along the bottom and roll the cone toward you gluing the boa to the cone.


Now take the boa and wrap it tightly around the cone, glue every once in a while.


Now if you want to use 2 colors like I did, start the next boa from the top. Sorry I have no picture for this, I didn't plan to have to use two boas and had to run to the store and was flustered when I got back.

As you come to meet the 2 boas in the middle you can choose to keep them completely separate or swirl the top one into the bottom feathers to combine the colors.


Take your embellishment and attach it to the top, mine was a pick so I just stuck it down into the cone.

Next is the ribbon. Here is a great way to make a bow.

Start with a long piece of ribbon


Fold both edges in to meet the middle, do a dab of glue and keep them down.


Now cut two long pieces of ribbon, these will be your tails.


Flip your folded piece over and glue each tail to the back


Now cut a small piece that will wrap around the middle.


Glue it on the back, wrap it around the front of the ribbon, between the two tails, pull tight and glue on the back again.


Perfect bow without the tying!

Glue the bow to the top of your tree.

Now take your candlestick and you can choose to attach it to the bottom of your cone, or just rest your cone on it. I decided not to glue so that I could do a different cone each holiday and just reuse the candlestick.


You are done! This took me less then 20 minutes and I love the funky way it looks.


Thanks again for checking me out this week! Come on over to And I Thought I Loved You Then for more crafts and fun chat. Also, check out Hangin 'Round for some of my wreaths for sale, use code BLOG2012 for 12% off your purchase!

It's super cute!  Love the adorable little heart picks hanging over the top.  DARLING!  Thanks for stopping by Kalyn!

Happy Valentine's Day everyone!!
Related Posts Plugin for WordPress, Blogger...