Sunday, December 27, 2009

My Fav Christmas Present and Washer Necklaces


I was so excited to open the present from my Mom on Christmas Eve! She gave me a Xyron 500 create a sticker! I was so jazzed when I opened it. I have been making stickers ever since!

I can't wait to make some cards and make all my die cuts into stickers:)
The machine is really easy to use. There is no plugging it in and no batteries. Just load whatever it is you want to make into a sticker and turn the knob clockwise and ta daa! It's a sticker. Too cool.

I have also been getting really obsessed about stamping with metal stamps. I bought a set of metal stamps yesterday at Ace Hardware for 29.99. A little spendy, but they last forever. I know you can buy them on the internet too. Here is the link to Harbor Freight: http://www.harborfreight.com/ Their prices are really reasonable, but I was too impatient to wait for mine in the mail:)

I am posting a few washers that I stamped yesterday and it was actually really easy! I did in on my garage floor, which was stinkin' cold, but it was worth it.

I messed up on the "A" on the Faith washer, but not bad for my first try, huh?

I am planning on making a lot more and attaching beads to them, and anything else I can get my hands on! They are sooooo fun!!

Anyone doing anything exciting for New Years Eve? I am going to try and stay up til Midnight. We shall see.....Happy New Year!!

Monday, December 21, 2009

Happy Holidays!!


I can't believe it's been over 2 weeks since I have posted! I am so sorry....I (like I am sure all of you) have been crazy busy with getting Christmas shopping done, class parties, Etsy stuff, etc. It has been hard to keep my life organized!

So here are some pics of some of the latest projects I have been working on.
I hope you enjoy them!
I sure hope you all enjoy your holiday and have a wonderful New Year!

Monday, November 30, 2009

What's that Button?

Have you noticed that new button on the top right hand corner of my Blog? ---------> 

If you click on this button, it will confirm the personal information from my blog profile. This company, Identity Profiles, allows you to provide proof of identity once, and then apply that proof to all of your personal web pages or blogs in the form of an "identity seal".

When I am online, sometimes I wonder if people really are who they say they are. There is so much deception online, I think the identity seal provides a nice reassurance for people who are surfing the web.

Click on it to see the confirmation page, and you can learn more!

Saturday, November 28, 2009

New Etsy Shop- Karisma's Jewelry and Gifts!!


I just wanted to let everyone one how excited I am about opening my NEW Etsy shop!!  I have been making lots of rings, necklaces etc. for friends and family and I have really enjoyed making them, so I thought.....why not open another shop?  It's not like my life is not busy enough as it is...he he!  

My 15 (almost 16....yikes!) year old daughter makes adorable earrings and she is trying to earn money to go to San Francisco with her Choir at school, so I have listed some of her earrings as well under the section Nat's fundraiser earrings.  I hope you all will go check them out.  She does a great job!!  I will include some pictures here of some of them.  

I hope you all had a fabulous Thanksgiving!  I have so much to be thankful for....especially healthy kids, a home that's paid off and no debt!  Thank goodness for this, since my hubby is out of a job right now. 

We have been so blessed though and I am truly thankful for our life together!


Thursday, November 19, 2009

Tutorial How-To Scrap paper Ball Ornament


WOW! I can't believe what a slacker I am. Life has been so crazy lately, it hardly seems like there is time to do everything I want to do, so something got put on the back burner and yep, it was my Blog!

Well I am back and I have a fun Ornament you can make with a plain ball ornament and scraps of paper! Here's how it goes:

First go purchase some of those clear balls at Micheals, Joanns, or your local craft store. They aren't very expensive, especially if you have a 40% off coupon!

Next find a bunch of scrap paper (I used scrapbook paper) and cut them into long thin strips )about 2 x 6 inches.

Take each strip and roll them into a circle. It's kinda fun!

Now take the top of your ornament off, and stick the paper inside the hole at the top. You have to roll the paper really tight to get it in there, but it will loosen up once it gets in. It is fun to use lots of different paper, that coordinates, but you can pretty much use any colors. I usually use about 6 or 8 strips of paper. Use enough to fill up most of the inside of the ornament.

Next, put the top of the ornament back on, and tie some cute ribbon onto the top where there is a loop for hanging. I put 2 or three different colors of ribbon.

I love these ornaments and think they are so adorable! They are a great gift. You can personalize them for someone special, by using their favorite colors, favorite sports scrapbook paper, holidays, etc. The possibilities are endless! I hope you will try this out and let me know how it went.
Good Luck to you and I hope you have a Happy Thanksgiving!

As always, I appreciate your comments and if you have any questions, feel free to e-mail me: kweight@byu.net

Wednesday, October 28, 2009

Giveaway on By Your Side Blog


This week Michelle of By Your Side is gracious enough to host a Giveaway for me on her Blog! I am so excited to do this!
I am giving away this gorgeous set of Christmas Cards. It is a set of 13 and they come with envelopes as well! Come check it out on her blog. It is very simple to enter!

Wednesday, October 21, 2009

Giveaway Winner!!

Congratulations Kelly Anderson! You won the uber cool Itty Bitty Travel Bag made by Michele from By Your Side!

Thanks to all who entered. I think it is my turn for a Giveaway next:) What should I giveaway? Do you prefer:

1. A set of Cards (holiday or everyday)?

2. A set of tags (holiday or everyday)?

3. A huge set of Matchbook paper pads?


Make a COMMENT below and tell me what you would like me to giveaway. I promise you won't be disappointed with this one. I will throw in something extra too:)

Monday, October 12, 2009

GIVEAWAY- Michele from BY YOUR SIDE on ETSY


Life has been a little crazy lately, but here is my next AWESOME giveaway! This is from my fellow Etsian and Oregonian Michele from By Your Side. She has an adorable shop on Etsy. You have to go check out all the fun things she has in her shop! She has been generous enough to give away one of her "Itty Bitty Brittany travel bags. They are soooo cute. Check out the pictures above.

Here is some information about Michele to get to know here better and how she began her journey to Etsy:

Hello! My name is Michele, I am the owner/designer and slave to the needle (both sewing and knitting), behind By Your Side. I live in “The City of Roses,” Portland, Oregon with my husband and two lovely daughters.

By Your Side was born, four years ago, when I couldn’t find that “perfect” purse. I thought to myself, “Michele, you know what you want, just make it!“ Through trial and error (a lot of error), I began designing purses to fit my needs. Then a funny thing happened, after carrying my own creations around town and answering many questions about them, it finally dawned on me that not everyone else sews or knits and they wanted to buy my purses! Thus, the birth of By Your Side!

I must confess, I am a “fabriholic,” and my yarn habit is just as bad! All of my creations are handcrafted from high quality fabric and yarns, with attention to detail and functionality. By Your Side’s purses and handbags are interfaced with Pellon for body and strength, and stress points are double or even triple stitched!

I have sold my purses for the last two years at The Gresham Farmer’s Market and at several local bazaars during the holiday season.


So...would you like one of these "Itty Bitty Brittany" travel bags? Well you can win one! Here's how you can enter the giveaway: (please leave one comment for each entry)

1. Visit Michele's shop By Your Side on Etsy and come back here and tell me what your favorite item is in her shop.

2. Follow Michele's Blog.

3. Become a follower of my blog (if you already are, state that in your comment).

4. Grab my button for your blog.


* if you don't have your email in your blog profile, please include it in one of your comments.


Good luck everybody! The winner will be picked through random.org on Monday October 19, 2009.

Thursday, October 1, 2009

Happy October!! Trick or Treat Block Tutorial How-To

Since today is October 1st, I got a little excited and made these cute Trick or Treat blocks. They were super easy! My friend Kara from Kara's Krafts cut the vinyl for me. She has her own website. Her prices are very reasonable!
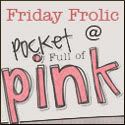
First I found some 2 x 4 wood at my Dad's house, and cut it to the size of my vinyl.

Next, I painted each block with 2 coats of acrylic paint (I used Americana, you can get it at JoAnn's or Micheals).

I sanded the edges of each piece of wood for an antique look.

Then I added the vinyl! Sooooo EASY!

You have to try this. I have done several of these lately and I can't believe how easy it is!

Let me know what you think! I love comments.....

Monday, September 28, 2009

We have a WINNER!!

Congratulations Liane! She is the lucky winner of Skylar's Candy Clips fabulous giveaway!

Thanks to all of you who entered the giveaway and followed my blog. I can't believe how popular this giveaway was! Sherryl and I are going to do this again sometime before Christmas.....so check back and win something else from her!

Stay tuned.....for a giveaway by me soon:) It's gonna be a good one!!

Monday, September 21, 2009

Giveaway from Skylar's Candy Clips


I am really excited to have this giveaway on my blog! Sherryl from the Etsy shop Skylar's Candy clips wants to give away one of these adorable Happy Flower Headbands! You can even customize your own Happy Flower Headband to an outfit - it is really up to the winner.
I have enjoyed getting to know Sherryl and I know you will too. Here is a little bit about her and her fabulous Etsy shop:

"I'm a mommy of three who LOVES making arts and crafts with her kids! Skylar's Candy Clips was inspired by my eldest daughter Skylar who called her hand made clips her "candy clips". Now almost four years old and a budding fashionista, Skylar took great care matching her outfit with a different clip everyday and we've gotten lots of compliments! Now her baby sister Peyton (who was born with tons of hair!) is following in her footsteps (their middle brother Deacon, for obvious reasons, unfortunately can only admire from afar). Skylar's Candy Clips has expanded to other cool products such as headbands, infant hairclips, ponytail holders, summer hats, baby beanies, and beach bags! Each item is designed and handmade by me with lots and lots of love!"

You have got to come check out her shop! She has much more than just headbands!

www.skylarscandyclips.etsy.com

Come check out her blog too! She does lots of cool giveaways as well:

www.skylarsclips.blogspot.com

So...would you like one of these Headbands? Well you can win one! Here's how you can enter the giveaway: (please leave one comment for each entry)

1. Visit Skylar's Candy Clips shop on Etsy and leave a comment with your favorite item in her shop.

2. Follow Sherryl's blog, Skylar's Candy Clips.

3. Become a follower of my blog (if you already are, state that in your comment).

4. Grab my button for your blog.


* if you don't have your email in your blog profile, please include it in one of your comments.


Good luck everybody! The winner will be picked through random.org on
Sunday, September 27, 2009.


Tuesday, September 15, 2009

Wanna Win these Gorgeous Cards?


I am so excited about this! I know you will love this set of 5 cards I am giving away on Skylars Candy Clips Blog. She is graciously sponsoring my giveaway on her blog. You have got to check out these adorable cards.
Just go to her blog and follow the directions to get your name entered in a drawing. You could be the winner! Go check it out.
If you have no desire to enter this giveaway, but would like to purchase some, they are for sale in my Etsy Shop!

Monday, September 14, 2009

Etsy Artist Feature: Brandy of brokenhallelujah


I am starting off this week featuring a great Etsy Artist:  Brandy of brokenhallelujah accessories.  She is a very talented artist and can crochet the coolest things!  My favorite are the Mary Jane Slippers in the picture above.  They look so comfy!  I also love the cute little coin purses. Read on to find out some cool things about Brandy and her shop:

How did you decide on your shop name?
My shop name comes from one of my favorite songs - "Hallelujah" by Jeff Buckley. It's a beautiful song and I couldn't help myself.

When did you start crocheting and why?
I crocheted when I was really little and then stopped for many years. When I was in college I had a boyfriend who lived in another city so when he had to go home, I was always looking for something to keep me occupied. I started looking at crafts and found some really cool crochet projects I wanted to take a stab at. So I retaught myself to crochet using videos on the web.

Are there other crafts you would like to try?
I would love to learn how to knit. I have knit cable envy because it's something you can't really do with crochet. I also wish I were better at sewing. And soap making is something I've wanted to try since I started selling online. I see all these wonderful handmade soaps and I wish I could do that, too.

Where do you craft?
Mostly at home on the sofa. I like to watch movies or tv shows when I crochet.

What or who inspires you?
I love yarn. Yarn shopping and buying new yarn usually leads to new inspirations. I really love looking at all the different colors and textures of the yarn. Sometimes I will have no idea what to make, pop into the yarn shop, and come out with my head full of new projects to work on.

Do you have a day job?
Not at the moment. I recently graduated from college and I'm looking for a job while I try to get into graduate school. It's proving tricky, but I have my crochet to keep me busy in the mean time.

What is the item in your shop you enjoyed making the most and why?
I love making my mary jane slippers. You can do so much with them to make them different with using the exact same pattern. Fuzzy yarns, soft yarns, different color combinations. It is a lot of fun playing around and making a new pair.

Thanks Brandy!

Come visit Brandy's shop brokenhallelujah: www.brokenhallelujah.etsy.com


Friday, September 4, 2009

Weekend Deals Labor Day SALE at Scrappin Corner!

This weekend from September 3rd-7th I am having a 20% off your entire order, plus FREE SHIPPING! How much better can you get than that:) Stop by my shop and take a look around. Check out my shop announcement for details.
Right now I have lots of Halloween, Fall and Christmas cards, tags, etc. in my shop. And of course lots of cards for all occasions!
I hope you can stop by and say Hi!
www.scrappincorner.etsy.com
Have a great Labor Day Weekend:)

Thursday, September 3, 2009

Back to School and Fall Leaf Card How - To Tutorial


Life has been busy here lately! I can't believe it is already September and the kids go back to school next week! We've done all the shopping and bought all their school supplies, so they are ready to go.

I have been watching a 3 month old baby 2-3 days a week, so that has kept me pretty busy lately. I love watching her though. She is soooo cute! The kids love her too and always want to hold her and make her smile:)

This week I thought I would try another Tutorial. I made this card last year, and I love the way the leaf turned out. It was fun to make and I thought some of you would enjoy making it for someone special in your life! Here are the supplies you will need:

Patterned paper in Fall colors
2 pieces of cardstock in Fall colors
1 piece of ribbon approx. 4 inches (I used brown)
metal embellishment to thread ribbon through. You can also use a pop top from a can of pop!
Diamond Glaze


This card was pretty easy to make. To make the leaf, you can stamp a leaf on the back side of some patterned paper (some kind of fall color) and cut it out, or if you have a large leaf paper punch, you could punch a leaf out and use that. I used a leaf pattern out of a magazine, enlarged it, then traced it on some cute patterned paper, then cut it out.

When you have your leaf cut out, then I use Judikins Diamond Glaze which is water-based dimensional adhesive. You can buy this at your local craft store for about 4.99.

Squirt out enough diamond glaze to cover the whole leaf with a thin layer. I also sprinkled gold glitter around the edges of the leaf. Put the leaf in the freezer for about 5 minutes. Take the leaf out and bend it different ways so the glaze cracks. If it doesn't crack, put it back in the freezer for a few more minutes.

You could put another layer of diamond glaze, then put it in the freezer again for a more "crackled" look.

For a 4 x 5 1/2 card, I used 1 piece 4 x 3 inches fall patterned paper, then 2 other smaller pieces of cardstock 1 was 2 1/2 x 3 (approx.) and 2 1/2 x 1 1/4. I like to use Bazzill cardstock and I choose Fall colors.

Adhere the 3 pieces of paper to the card, then, thread the ribbon through the embellishment or pop top. Glue ribbon on card.

I stamped "thanks" then cut it out and adhered it next to the ribbon. You could also print out a sentiment, then cut it out and adhere to the card.

If you have chalk ink or a brown stamp pad, rub the pad around the edges of the card. It gives it a vintage look.

That's it! I hope you enjoyed this tutorial. I sure did. If you have any questions about how to make the card, please feel free to leave a comment, or e-mail me!
kweight@byu.net

Check back here next week for a Etsy artist feature!

Saturday, August 22, 2009

So sad the Summer is almost over!!

I love this picture of the Oregon coast from the Astoria Column. It was a beautiful day!

The kids playing on the beach at Cannon Beach.

My 7 year old showing her her cut she got from falling on some rocks at her friends house. She didn't have to have stitches though!

Building sand castles at Cannon Beach. Dad is awesome at building castles!


I have been such a slacker lately! I haven't posted in about 3 weeks, holy cow...you know how Summer is. I have wanted to post a little more personal things on my blog, so this time you will be able to see what my family looks like and what we love to do!
We have had lots of family visiting from out of town and have gone on a few mini vacations. It has been a fun summer, but gosh, I am so sad it is almost over! I have to admit though, I am ready for the kids to start school. Don't tell them.....ssh! Here are a few pictures from my recent trip to the Oregon coast!

BTW today is my anniversary! We have been married 17 years. I can't believe it. Time has gone by so fast. It has been a fun ride! We wanted to go somewhere exciting, but it has been so crazy around here, I think we will just go out to dinner maybe to the Outback. I love that restaurant!

Monday, August 3, 2009

Card for 2 Sketches 4 You challenge


I made this card today for my first card challenge. The website is called 2 Sketches 4 You. I got up enough courage to try a challenge. I am really curious to see what you think of this card, so please leave your comments...good or bad. I can take it:) If you like this card and would like to purchase it, you can find it in my Etsy shop! Come take a look and see my other cards as well!
For this card I used:
Fancy Pants paper- Simplicity line
Chipboard flower- KI Memories
Brown Chalk ink

Monday, July 27, 2009

Orange Juice can ornament lid Tutorial


I didn't make this up. I found it in some craft magazine a few years ago. I thought it was such a cute idea, and you can feel good about recycling something! It's such a cool thing:)

The first thing you need to do is drill a hole in the lid. Very easy. Use your hubby's drill. Just big enough for a ribbon to fit through.

Next you find some kind of Christmas image or any holiday. I used a Christmas image I got from Etsy. They have tons of cute digital images on there!

I cut out the image the shape of the orange juice can lid, then glued in on with Modge Podge.

Next, you can add buttons, ribbon, and whatever! I decorated the back too. I glued the buttons, etc. on with glue gun. Find some cute ribbon to string through the hole and Ta Da! You have a totally adorable ornament to give someone as a gift or keep for yourself!

You can even glue pictures of your kids, baby, etc. as well!

If you like these and want to purchase them from my Etsy shop, come visit at:
www.scrappincorner.etsy.com

If you have any questions about this tutorial feel free to leave a comment (I love them!) or e-mail me at kweight@byu.net.

Wednesday, July 15, 2009

How to Blue Flower Glass pendant Tutorial- Easy!


I love glass pendants that I see on Etsy and I have always wanted to make them. They are really easy to make! Here are some easy directions on how to make the one pictured here:

1. I used a rectangular glass pendant, but there are the square ones too. I traced around some Japanese paper (or you can use scrapbook paper) the size of the pendant. Cut out the paper.

2. Squirt some judkins Diamond Glaze (you can get this at any craft store) on the glass pendant. You don't want too much glaze, or it will ooze out the edges. Then I set the pendant (rough side down) on top of the paper (design side up). I use wax paper to set the pendant on, so it doesn't stick. Then I let the pendant sit on the paper for a few minutes. I also try and wipe any excess glaze off around the edges.

3. After the glaze has dried, I take a nail file and file around the edges of the glass pendant to get any excess glaze and paper off. The paper will be hanging off the edges a bit, so you want to file that off. Let it dry completely.

4, Using Modge Podge(also at craft stores), brush a layer on the back of the pendant. This seals the paper on and makes it look nice! I usually put 2 or 3 layers of modge podge on letting it dry between layers.

5. I used E-6000 industrial strength glue to glue the sterling silver bail on. You can get E-6000 at any craft store. Glue the bail on (large for the rectangle pendant). You only need a small amount of the glue. Make sure the bail is centered. Let the glue dry overnight.

Wasn't that easy? I love how quick these are to make, and they look like you spent forever making them!

Here is a list of Etsy shops where I got my supplies:

http://www.etsy.com/shop.php?user_id=5925608
-I got the japanese paper and large bails here.

http://www.etsy.com/shop.php?user_id=6698169
I bought the glass pendants and ribbon necklaces here.

If you have any questions about this tutorial, please e-mail me:
kweight@byu.net, or leave me a comment here. I love comments!

Friday, July 10, 2009

Giveaway Winner!!

The winner of the Flower card is Crystal from KIZZ! Congratulations Crystal!!
Hope you all have a great day!!
Related Posts Plugin for WordPress, Blogger...