Friday, April 15, 2011

Lovely Little girl gifts- Headband and Purse

My 9 year old daughter was invited to 2 birthday parties tomorrow!  I dreaded going to the store and trying to figure out what these girls would like, and I hate spending lots of moolah on gifts.  Soooo I thought to myself, "Who wouldn't like a headband and a cute little purse?"  I have been on a headband kick, so last night I whipped these little babies out:
The little girl who is getting these, LOVES the color Yellow.  So ya think she'll like??
The other little girl who is getting these LOVES green, so I thought these would do the trick!
I especially LOVED how this headband turned out, so I had to take a close-up.  So cute:)
Here they both are together (duh!).  I made the purses about 6 months ago when I was obsessed with making pursed and bought a crap load of fabric!  It's a good thing I did!!

I think we will fill the purses up with some candy.

Have a fantabulous weekend!!  We are having record rainfall, so no SUN for us!

Linking up with these parties:
House of Hepworths
The Shabby Nest
Fingerprints on the Fridge
Fireflies and Jelly Beans
Spunky Junky 
Tatertots and Jello 
Flamingo Toes
I heart naptime

Tuesday, April 12, 2011

Spring Burlap Wreath

I have wanted to make a wreath like this ever since I saw one like it on Tatertots and Jello.  Jen's blog is fabulous!  You have to check it out (if you haven't already!).  She is very talented and has soooo many fun crafts and tutorials!

I tweaked my wreath a little, but I pretty much did the same thing she did.  I used coordinating fabric, Burlap, and for the centers I used buttons and sticky back pearls.  I used one of those $.50 cent wreaths I got from Salvation Army (yay!), fabric and burlap I already had, buttons and pearls that I already had.  So this wreath cost me about $1 to make.  I LOVE that price;) It just gives me a warm, fuzzy feeling....

Here is my take of the Spring Burlap Wreath:
This probably took me about 1 hour to make.  I cut all the circles at once, folding the fabric over several times, so I could cut out about 4 at once.
Please excuse my ugly walls.  I soooo need to paint them and I am planning on it this summer!  
I absolutely Luuuurve this fabric!  I have had it for a while but just never used it until now. 

Hopefully now that ALL of my SPRING decorations are out, the weather will actually be warm enough to wear a short sleeved t-shirt!  I can tell it's coming....
Have a great week;)

I am linking up to these parties:
Sugar Bee Crafts
Someday Crafts
So Much Ado
Reasons To Skip The Housework

Saturday, April 9, 2011

Easter Favorites

I have seen so many cute Easter Crafts and treats out there.  Here are some of my favorites:
Felt Spring Vase
So adorable, right? I love the felt looped around the can and the buttons! You can find the tutorial for this on holiday-crafts-and-creations.

Bunnies and Chicks
I liked these because they are used with recycled egg cartons!  I thought they were really cute too.  You can find the tutorial at Our Big Earth.

Easter Bunny Cake Pops
I HAVE to try these this year!  They look sooo dang cute!  Love the candy corn ears.  You can find these at Bakerella.

Edible Easter Decorations
I saw these cuties on Country Living.  I love that they are edible!  So fun:)

I hope you're having a great weekend and if it is nice weather where you are, I hope you're out enjoying it!  See you Monday.

Friday, April 8, 2011

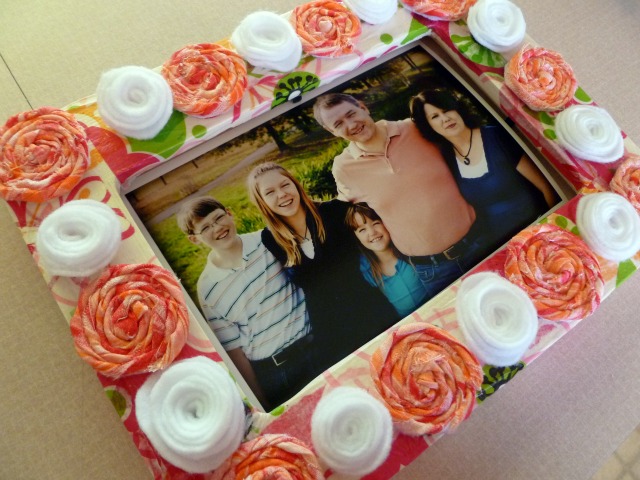
Mod Podged Frame with felt and fabric

I am looking for crafty people who would be interested in being a guest blogger!  If you are crafty, sew, or cook, and think you would be interested in doing a tutorial, share a recipe, etc. , please e-mail me at kweight@byu.net.  I would love to have a guest blogger once a week. I look forward to hearing from you! 

I love when you can make a craft for about $2!  I bought the frame a few months ago at Michael's, the tissue paper at Walmart and have a TON left, I had the fabric and felt already on hand.

Here is what you need:

Wood frame from $1 section of Michael's or other craft store
Tissue
Mod Podge
fabric
felt
picture
glue gun

I sanded my frame a little and painted it light Ivory.

I just painted one coat of paint.
Next, I ripped lots of strips of the tissue in different sizes. 
Now is the messy part!  Start sponge brushing Mod Podge all over the frame and press pieced of tissue all over the front and sides.  Sometimes I had to rip the piece to make it fit well.  No biggie.  It will look great no matter what.  You can't really go wrong with this!
I let the frame dry in the sun (yes, we actually had some today!).  It took about 1/2 hour.
This is where I fit the picture in and made sure all the flowers fit well on the frame before I glued them all down.

Here it is all finished and in my garden window!  I really love the tissue underneath.  It gives the frame a little more POP of color.  

Today has been such a beautiful day!  The sun is out and the trees are blooming!  It's amazing what a great mood the sun can put me in:)

I am linking up to these parties:
Fingerprints on the Fridge
Shanty 2 Chic 
Sassy Sites 
Spunky Junky 
Tatertots and Jello 
Mad Skills Party 
C.R.A.F.T. 
Craftoholics Anonymous 
Creative Crate 
Craftomaniac

Tuesday, April 5, 2011

Repurposed bowl and candle holder

  I told you a while back about my score at Salvation Army, right?

See that silver bowl and that brownish looking candle holder on the right corner?  
(To see what I did with the "Seaside" sign, go here)

Here is what I have done with them:
I am lovin' this color Blue!!  Doesn't it just scream SPRING?  The Rattan balls are from the Dollar Tree.  I hand painted (actually I used a sponge brush) them, using water based acrylic paint.  Here's how I did it:

BEFORE
Not much color to them, huh?  Just plain old wicker white. 
Here are the paint colors I used:
Sweetheart pink
Lemon Yellow
Lilac
Spa Blue
Tangerine
Mint Julep Green

The paint was all Americana brand, except the Sweetheart Pink was Folk Art.

AFTER!

I love it!  I put it in my Garden window, so I can look at it all day!
Happy Spring!(WINK)

I am linking up with these parties:
Whipperberry
Flamingo Toes
Craftomaniac
Sew Much Ado
Fireflies and Jellybeans
Home Mom Blog 

Friday, April 1, 2011

Easter Subway Art on a Canvas Tutorial

I don't have school on Fridays (yay!), so I got in the crafting mood!  I had ordered some Subway art from Simple Crafts a few weeks ago.  Today I finally used it.  I had bought a 12x12 canvas from JoAnn's a week or so ago (about $4).

I watered down some orange paint (Tangerine), and painted the canvas.
I let it dry for about 1/2 hour, while I ate a yummy smoothie with chips and salsa, and a tiny bit of homemade Chicken Noodle soup!
I laid the vinyl over the canvas to make sure everything fit ok.
Here is what it looked like when I finished!  
See those cute little rattan balls?  I will post about those in a few days!

I am linking up with these parties:
Related Posts Plugin for WordPress, Blogger...